Home of The French Marketplace

La joie c'est le partage
{ the joy is in the sharing }

Sunday, January 30, 2011

Sunday Blessings


Be assured that abuses are done away with by teaching rather than by commanding. If we make threats, let it be done sorrowfuly, in the words of Scripture, and in terms of the world to come. In this way it is not we who are feared because of our power, but God because of our words.
-- St Augustine

Saturday, January 29, 2011

The Flowers and the French Bucket

Okay, I'm back as promised with instructions for a couple of projects.
First, the flower rosettes. I'm sure many of you have seen these before ~ I can't take credit for them. They are quite the addictive little project and oh so easy!

All you have to do is cut out little circles of polyester satin fabric in graduated sizes and then melt them {very carefully} over a candle flame.


I got so excited with this project that I forgot to take photos as I was going along...

I just kept cutting fabric and melting edges


However, you can go here for an excellent step by step tutorial with photos!
Plus, she has lots of other cool projects you can check out as well.
~~~~
Now, on to the French bucket!
I did take step by step pics for this one.
I saw this bucket at the Christmas Tree Shop and at $2.99, I couldn't resist. I knew right away what I was going to do with it.

I picked out a font that I liked {Times New Roman} and printed out No.1 {size 180}

Turn your printed number over and on the back of your paper rub a pencil over the area where your number shows through


Now, flip the paper back over and put it where you want it on your bucket. Tape it in place.

Take your pencil and carefully trace your design {it doesn't have to be perfect}

Remove your paper and voila, your image has transferred to your bucket!! Now just get a thin paintbrush and a bottle of black acrylic paint and fill in your design. When you're finished painting, let it dry completely. Then, with a fine grit sandpaper very lightly sand your number to give it a worn appearance. Wipe away the sanding dust and go over the whole bucket with a glaze made of the same black paint and a little bit of water. You can add as little or as much water as you want. I made mine to be the consistency of milk. I took a wet paper towel dipped in the glaze and wiped it over the entire bucket. Right away, I wiped it again with a dry paper towel until I got the look I wanted. The last step was to add a little of the paint{full strength - no water added} to the lip of the bucket and to the edges of the handles. This sort of gives it the appearance of worn enamel.

And there you have it. A new worn, old french bucket.
Enjoy!
Happy Saturday.
xo and God Bless,
Kathleen

Thursday, January 27, 2011

A Winner, A French Bucket and Some Cool Rosettes!


Okay, finally I am posting the winner of my giveaway! Please accept my sincerest apology. My intentions were good I promise, I actually did the random number generator first thing this morning but never got around to actually announcing the winner.

All because of this!
Yep, almost a foot of the white stuff. School has been cancelled for the past two days and I haven't been able to get much of anything done.
However, better late than never I guess. Sorry to keep you all in suspense all day.


On to the winner...I used the random number generator to pick a winner and it chose lucky
#36

Yay~~ Kathleen from Faded Charm was the winner!!
Congrats Kathleen!!


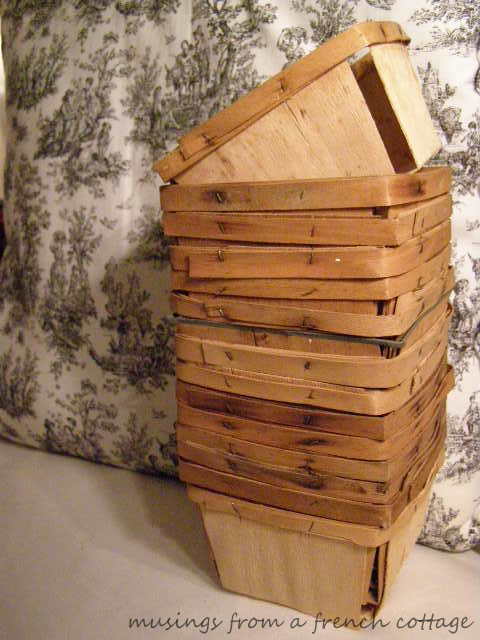
Thank you all so much for playing the guessing game with me. It was fun and just about every one of you guessed it correctly. The mystery photo was a bunch of berry baskets all stacked up. I think I'll have to make it harder next time!!

Okay, so as you know, I kept the giveaway prize a secret as well.
Kathleen? You wanna know what you have won???
~ A {fabulously faux} grainsack pillow slipcover hand made by me~
It will fit any standard size pillow

~a couple of those berry baskets~
~a heart shaped, lavender filled rice pillow that can be popped in the microwave to warm it up~
{perfect for snuggling on the couch on these chilly winter nights}
and last but not least
~a cute ruffly bag with a fun handmade rosette~
{which you will see below}
oh, and there is also some yummy hand lotion packed inside a fun little Parisian themed box!
~~
I apologize that the additional items are not pictured. I will post them soon enough. It's just been a bit hectic and I haven't been able to get them photographed yet.
~~
Thanks so much everyone for playing! I enjoyed it.
~~~
Kathleen, email me when you get a free minute with your contact info and I will get your goodies right out to you.

Okay, next on the list...the french bucket and the little flowers I had been working on.

Aren't they adorable? And so easy too. I'll add all the details in another post in the next day or two.


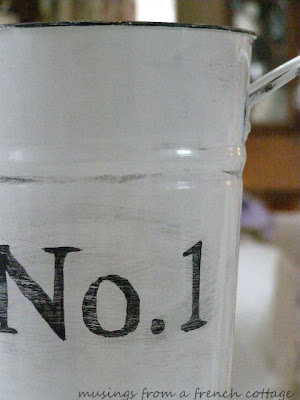
and here is the bucket . I will post a full tutorial in the next day or two so stay tuned!
Thanks again everyone for reading and visiting.
xo and God Bless,
Kathleen

Tuesday, January 25, 2011

Don't Forget!

I was going to show you a French bucket I've been working on, along with another little project I just finished today...but...the day quickly got away from me and it just didn't happen.
Tomorrow??
I think so!
~~
Don't forget to enter my giveaway here. It ends tomorrow at midnight. I will draw the winner on Thursday!
~~
xo and God Bless,
Kathleen

Sunday, January 23, 2011

Sunday Blessings

" ...for your Father knows what you need before you ask Him. Pray then like this:
Our Father who art in heaven,
Hallowed be Thy name.
Thy kingdom come,
Thy will be done,
On earth as it is in heaven.
Give us this day our daily bread;
And forgive us our debts,
As we have also forgiven our debtors;
And lead us not into temptation,
But deliver us from evil."
Amen
Matthew 6:8-13

Thursday, January 20, 2011

Color Me Red...

I have decorating issues and they're driving me NUTS!! While I simply love Nordic French/Swedish styles and desperately want that look, I just cannot seem to make it work in our home. It always seems slightly off to me. I keep trying~tweaking things here, rearranging there but it's just not workin' for me. I swoon over these images in magazines, blogs, and books but I can't get comfortable with it in my own house. What's up with that? The funny thing is, no matter how much I love it, I continue to be attracted to bold reds and soft blues! I know, crazy right? I don't get it. So I picked up my copy of French General the other day and loved everything in it so much that I decided to just go with it. Rather than fight my color urges to stay within an all white/grey color scheme throughout the whole house, I've decided to go more French Country/Provincial in the kitchen and adjoining family room. I'll stick with the grey/blue-grey/white color scheme in the bedroom and in my craft room {It works in those rooms and I love it there} I've just decided to mix it up a bit, throw all the decor rules out the window. I still love my grain sacks and my burlap and they look great with my splashes of red and {gasp} black!

So I've redone things a bit. Added some old clay pots in a basket by the french doors awaiting spring


added a red book to the mantel vignette


put some of my favorite books in a galvanized french tub

{notice French General front and center}


made some pillow covers with oversized red checks


black and white toile


and pom pom fringe {seriously fun}
except Abigail keeps trying to bite them off!

Then, I painted some of my frames black and threw them in for good measure!
It feels better in there now. Don't worry, I still love me some burlap and grain sacks and my new {old} bench is right there in the mix too. This is just working better for now.
Have a great day everyone.
xo and God Bless,
Kathleen

Sunday, January 16, 2011

Sunday Blessings


Behold, how good and pleasant it is when brothers dwell in unity!
Psalm 133:1

Saturday, January 15, 2011

The Tale of an Old Bench

My son comes home from school. " Oh no! I forgot my spelling book." He says.
"Okay everybody, into the car. We have to go back to school." I say.
This is how the story begins...
We're driving along and I spy this {pictured above} peeking out from under someone's trash (furniture trash, not smelly, stinky garbage trash)
Anyway, I tell everybody, "Hold on. We're stopping. I have to get this." I park and get out, and see a sign that says FREE. It's my lucky day. I know I can doing something good with this. As I'm pulling it out, school buses are passing with drivers I know. Neighbors drive by and they wave at me. Oh my goodness...they must think that I've officially lost my mind. I can hear the whispers....did you see her? She was pulling something out of the garbage!!
But this is cool...and besides...it's not really garbage is it?

I mean, look at these legs? It's perfect!!

I'm imagining a sweet little step-up bench to Abigail's big girl bed one day. That's a few years away I realize, but hey I'm thinking ahead.
Okay, back to the story. So I grab it and haul it to the car.

Husband sees it the next day and gives me the oh my...just what are you going to do with that look.

Just wait, I say...I've got great plans for this baby!

so I start sewing

and then I pay a visit to The Graphics Fairy


and suddenly, the perfect bench is born!
Oh, and husband said to me last night...
"You know, I really like that bench."
SMiLe.
LoVe.
End of story.
~~~~~~
Have a wonderful weekend everybody and thank you for entering my giveaway!
If you haven't entered yet, you may still do so by clicking here.
~~~~~
xo and God Bless,
Kathleen

I'm linking up with My Romantic Home for Show and Tell Friday
and Miss Mustard Seed's Furniture Feature Friday

Wednesday, January 12, 2011

What Is It??? A Giveaway!!!


I wanted you to know how thankful I am to all of you who read my blog. To show my appreciation, I'm going to have a giveaway!
I'm putting a fun little twist on this one. It's very easy to enter. All you have to do is this:
1) take a look at the above photo and leave me a comment telling me what you think it is
this will get you one entry
***
2) add my blog button to your sidebar for a second entry
{leave me a comment letting me know you did this}
***
3) post about this giveaway on your blog for a third entry
{again, leave me a comment letting me know you did this}
***
There is one more twist to this giveaway ~ the prize is going to remain a secret!!
(but I promise you it is good!!)
Thanks everyone for visiting me and for taking the time to read my blog. Your thoughts and comments are always appreciated!!
Now, get to studying that photo and tell me what you think it is!!
***
xo and God Bless,
Kathleen
Deadline for entries will be Wednesday, January 26, 2011 at midnight.
I will draw a name on January 27!
Good luck everyone!!

Sunday, January 9, 2011

Sunday Blessings

And Peter opened his mouth and said: "Truly I perceive that God shows no partiality, but in every nation any one who fears Him and does what is right is acceptable to Him."
Acts 10:34-35

Thursday, January 6, 2011

A Sweater Re-Fashion Tutorial

I am trying to accomplish some things around here that I've been meaning to get to for so long. Things desperately need to be organized, unused items need to be donated and this bag of sweaters in my closet...they need to be re-purposed. I love each one in that bag, but for whatever reason, they don't look quite right anymore. Let's be honest, they're just old. They're in great shape though, so I thought I would try to freshen them up with fabrics and trims. Give them new life and then see if I like them any better. If not, I will get rid of them. Anyway, I got working on the first one this morning and liked it enough to share what I did.


Here is one of the sweaters. It's a great sweater but needed some jazzing up.


I found an old T-shirt...way past it's prime...and decided to cut it up to make some ruffles and a flower for the sweater.

First, cut straight up the middle of an old sweater. We're going to make a cardigan with this one.

Now, cut the bottom hem off of the t-shirt and then cut a total of five strips out of the shirt. I made each of my strips about an inch and a half wide.


Now, cut open each of the side seams so that you have five really long strips. Take one of the strips and set it aside for the flower (which we will make later). Take two of the remaining strips and sew them together to make one super duper long strip. Take the last two strips and sew them together to make one more super duper long strip. These will be the ruffles.

Okay, time to make the ruffles. Adjust the stitch length on your sewing machine to the longest length. Now sew a straight line right down the middle of one of your super duper long strips. Do it again for the second strip. When you are finished, separate the top thread from the bobbin thread. Now gently pull the top thread as you gently gather the fabric into a ruffle.
Hint...when your ruffle is the length that you want it, tie off the top thread and the bobbin thread on each end so your ruffle doesn't come unravelled
When your ruffle is complete, pin it to one side of your sweater as shown above and then do the same thing for the other side and other ruffle.

Let's move on to the ruffled flower.
Take the one strip you have left and sew another straight line down the length of the strip. Instead of sewing down the middle though, you're going to sew along the edge. Gather this one into a ruffle too. As you can see in the above photo, it's going to be a lot shorter than the other two were.
Now...before you do anything else, reset the stitch length to normal on your sewing machine. Do it now so you don't forget later.
To make the flower, simply roll the ruffle up (just like you would if you were quilling paper) and hand stitch it along the bottom as you go. Stitching it will hold it all together nicely when you're finished.

Here is the flower when it's done.
Now you're all ready to sew the ruffles onto your sweater. After you sew them on, you can either sew on your flower, or use a safety pin to attach it to the sweater. I used a safety pin. This way I have flexibility when wearing it. I can easily take the flower off or leave it on.
Enjoy your new (old) sweater!!
Now go find an old sweater in your closet and see what you can create. It's fun!!
~~~~~~~~
xo and God Bless,
Kathleen
~~~You must go and check out Ruffles and Stuff~~~
Her blog inspired this little makeover and there is so much more to see over there!!
~~~
Linking up to...