Home of The French Marketplace

La joie c'est le partage
{ the joy is in the sharing }

Friday, December 20, 2013

Merry Christmas


Christmas is fast approaching and I know first hand how busy we all feel right now.  
I have been baking non-stop, putting together little teacher gift packages, let's not forget the school bus driver and the mail carrier!
Checking off lists and putting those final touches on all of my decorating...
but let's not forget the REAL reason for the Christmas season!


Take a moment to sit by the twinkling lights of your Christmas tree, to reflect and give thanks...

...And the angel said to them, "Be not afraid; for behold, I bring you good news of a great joy which will come to all the people; for to you is born this day in the city of David a Savior, who is Christ the Lord..."
Luke 2:10-12


I wish you all a very blessed advent season.

xo and God Bless,
Kathleen


Tuesday, December 17, 2013

Clay Christmas Ornaments or Gift Tags


I revisited my clay ornaments this year.  I was determined to make that clay recipe work better this time.
This time it worked perfectly.  Instead of doubling the recipe {it just doesn't set up properly that way}
I followed the recipe exactly.

1/2 cup cornstarch
1 cup baking soda
3/4 cup cold water

Stir together all ingredients in a pan and cook over medium heat.  As the mixture comes to a boil, keep stirring until it thickens.  You will then be able to use your SPOON (not your hands-it's hot...just sayin') to form the dough into a gloppy ball. 
Remove the pan from heat and cover it with a moist towel.  Let it sit until cool enough to handle.  Once cooled you can sprinkle a bit of cornstarch on the counter and knead it a few times. 
You will then have a perfectly soft, not sticky dough to work with.  Roll it out and cut into shapes just like you would if you were making sugar cookies.
If you'll be hanging them up or using them as gift tags, make sure that you poke a hole in them for stringing before you bake them. I just used a straw.
Bake them in the oven at 175 degrees for about an hour.  Flip them over half way through baking time.
I stamped mine with rubber stamps before baking but you can leave them plain if you want to.
Once baked and cooled these can be painted if you wish.
I've hung mine on the tree for Christmas.


Have fun!

xo and God Bless,
Kathleen


Monday, December 16, 2013

Press Feature: DIY Decorating Addict

I am so excited to share good news with you!
Musings From a French Cottage was featured in the Christmas issue of DIY Decorating Addict.
The magazine is available exclusively on the Apple Newsstand.


The magazine is full of all sorts of great DIY ideas and is available for purchase or subscription via the Apple Newsstand.

Remember my DIY mercury glass tutorial with the lamp makeover using looking glass paint?  The article was featured and I'm over the moon excited about it. 
A big thank you to Dianne Corriere, DIY Decorating Addict creator and editor/publisher for including my article in her amazing magazine!

Included in this issue are some great gift wrapping ideas, beautiful DIY wreaths, and lots, lots more.  I'm going to include a link that will take you to the magazine App in the Apple Itunes store.  You can download the app and then purchase a subscription through the app. 
But guess what?  The December issue is special because it's free for anyone to download!  So head over and check it out.

The December issue is FREE!!

Thanks again Dianne!

Happy Monday Everyone.

xo and God Bless,
Kathleen


Saturday, December 14, 2013

DIY Mercury Glass Christmas Trees


It's been a year.  A whole year.  Yes, I know, how terrible of me to stay away for so long!  Things just got busy and one day turned into another, which then turned into a month and well, here we are...an entire year later.
I'ts been a good year though.  We have been blessed and are so thankful.  We spent most of our weekends this summer at our cabin by the lake in the mountains.  We were excited to spend another week in South Carolina enjoying the beach {A family member lives there part time and was so gracious in sharing his home with us} I've been keeping busy with all sorts of fun little projects too.  
I've re-done lamps, made chalkboards, painted cabinets, started Project Life...I've been sewing, reupholstering chairs and ottomans...I completely re-did our bedroom {with an absolutely amazing color on the walls} and I've even dabbled in paper crafting and card making!
Whew, a lot I know but it's been a year remember?
I'll be sure to share all of these things in the coming weeks but for today's post, I wanted to share a project that I did for Christmas.

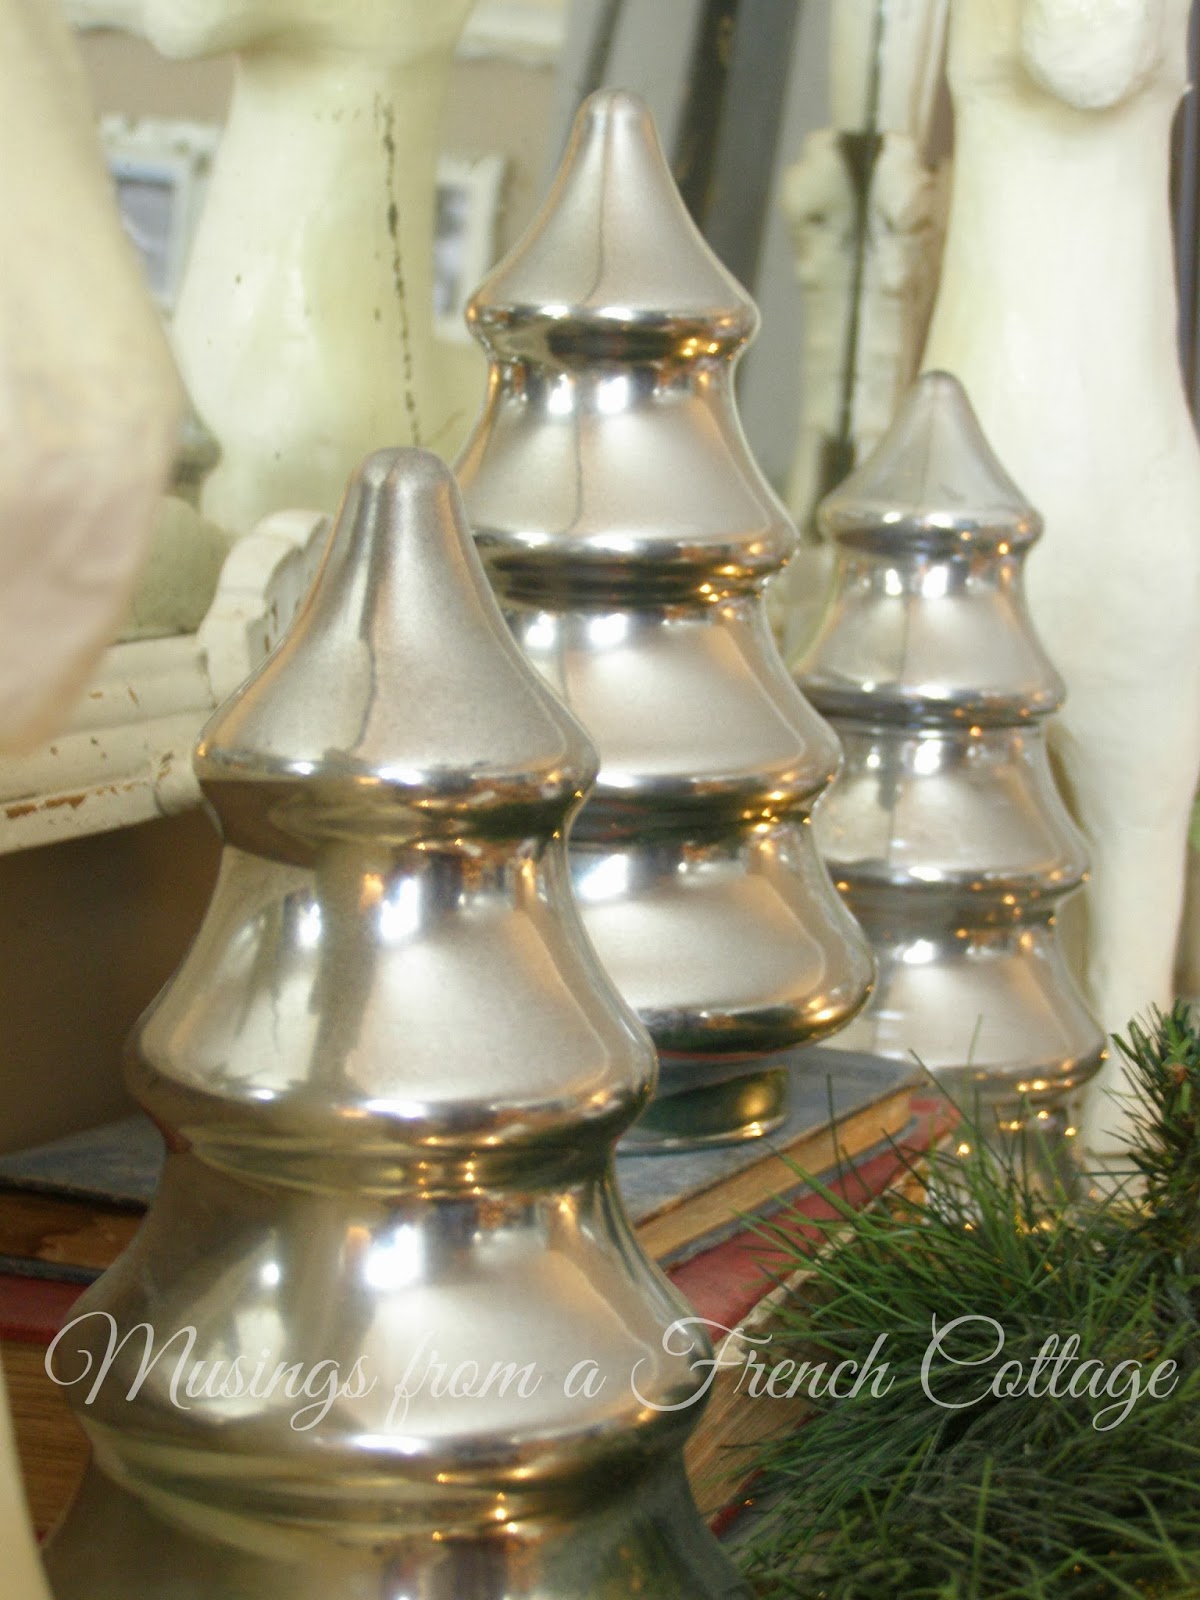
Mercury glass Christmas trees.
  I know you've seen them around.  They're so pretty and they add the perfect amount of sparkle to your Christmas decorating.
Let's face it though, they're expensive.  Especially if you wish to use more than one!
So, one day last year while walking through the Salvation Army thrift store I saw a tree shaped glass container and it sparked an idea.  It was 25 cents so I scooped it up and then started collecting them all year.


When it was time to start decorating for Christmas this year, I had seven of them (one of them isn't pictured here).  Most were clear glass but two were green in color.  They had a plastic lid that seals the bottom.  I think they were used as candy dishes?  The best part?  I only paid 25 cents each for them except for the large one in the back...it was $1.50
Using my DIY mercury glass technique that I posted about here, I went to work painting all of these trees with Krylon Looking Glass Mirror paint.  

I love how they turned out and they add just the sparkle that I was looking for!


I've scattered them throughout the house and they've landed on tabletops, the piano, and the fireplace mantel.
I even put two of them on our bedroom mantel.  I love them!


Thanks for stopping by and I hope you all are enjoying a blessed Christmas Season!

xo and God Bless,
Kathleen